Commercial Solar Panel Installation: Everything You Need to Know
Across the United States, property owners are opting for solar panel installations to save money, be more environmentally responsible, and represent their values to customers.
If you’ve been thinking about a commercial solar panel installation for your property, this page is your guide to the essentials.
Ready to talk about your commercial solar installation?
Use the form below to get started
Key facts
- A commercial solar installation is an excellent way for businesses, landowners, non-profits, and other organizations to save money
- Commercial solar owners are eligible for the Federal Solar Tax Credit worth 30% of the system cost
- Tax credit eligibility has changed due to the One Big Beautiful Bill Act (OBBBA). If you think you want a commercial solar installation, it is best to act quickly. Any project begun after July 4th of 2026 will need to be completed by Dec 31st, 2027.
- Commercial Solar Guy brings decades of expertise, experience, and know-how to your commercial solar installation. We’ll bring your project to life with the best equipment, on budget and in time.
What is a commercial solar installation?
A commercial solar panel installation is any solar installation that serves the needs of a non-residential or multifamily property owner.
In this case, “commercial” means more than just businesses!Schools, farms, and non-profits can take advantage of the benefits of a commercial solar installation, too. Basically, any non-residential solar system falls under the category of commercial solar.
When a solar panel system is owned by a business, church, farm, municipality or other entity, it becomes an asset that belongs to that entity. That comes with special tax rules, including benefits like the Section 48E commercial solar tax credit and accelerated depreciation.
We’ll discuss these tax rules in more detail in the section on financing options and ownership models below.
It’s not just solar for commercial rooftops
There are many different types of solar installations, including:
- Retail and small business rooftops
- Industrial and warehouse rooftops
- Solar for non-profits and faith-based organizations
- Agricultural solar (agrivoltaics)
- Public sector and education
- Solar carports
- Ground-mounted arrays
- Floating solar (floatovoltaics)
- Building-integrated photovoltaics (BIPV)
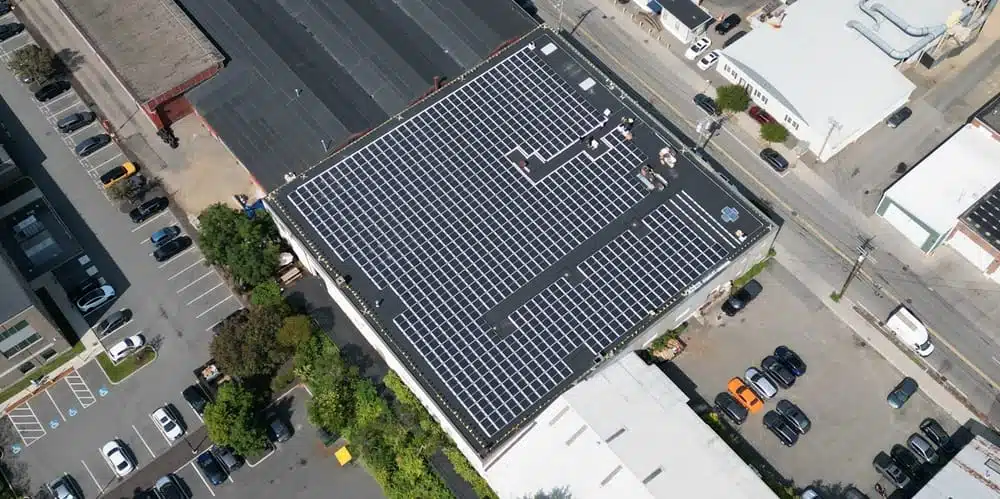
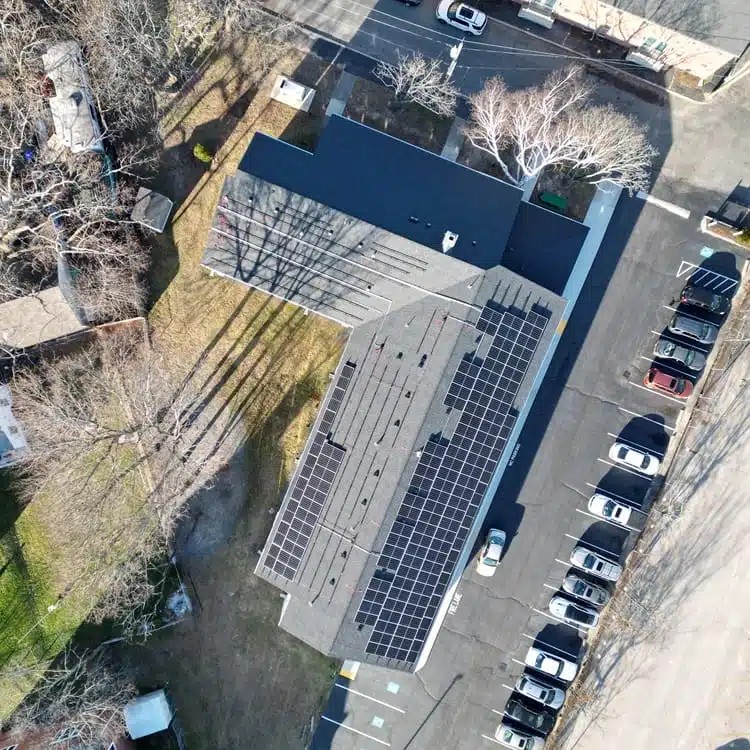
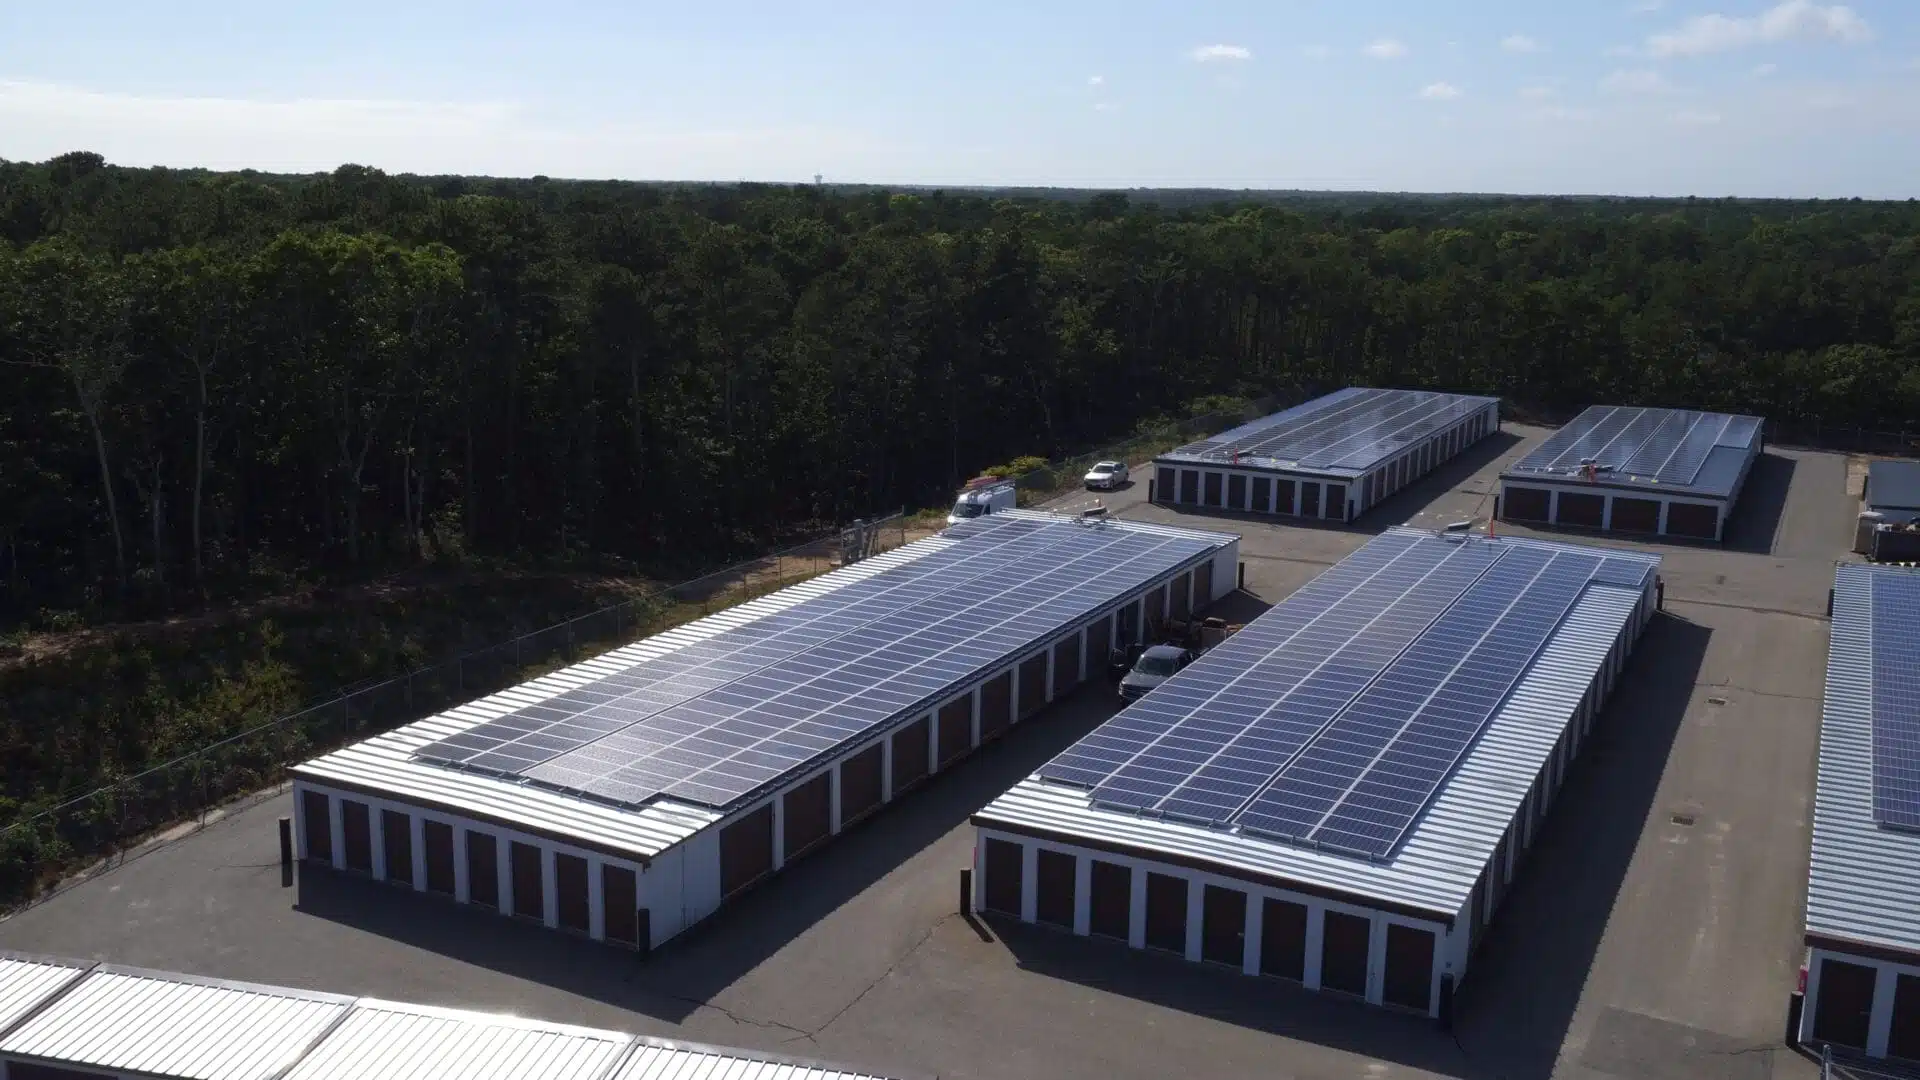
DCIM100MEDIADJI_0042.JPG
Multi-building rooftop installation
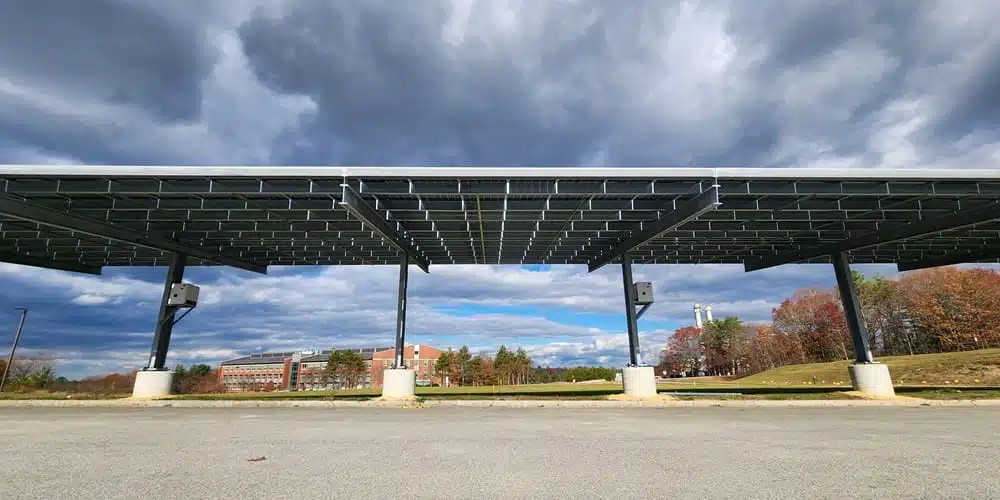
ConstructionServices.image.completecarport
A large solar carport

Harvard_Ballast_Rooftop
Ballasted Commercial Solar on EPDM Roof
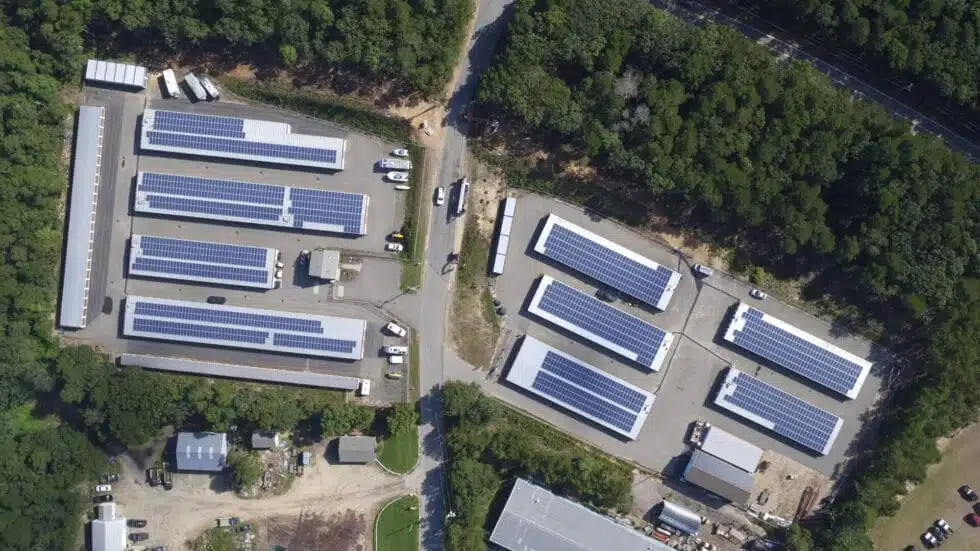
commercial solar farm installation project in Massachusetts by solar energy consulting company
Ground-mounted solar farm in Rhode Island
Commercial solar on an asphalt roof
What Commercial Solar Guy can do for you
As the nation’s #1 commercial solar consultant, we’ve developed and built numerous projects, including multi-use buildings in Rhode Island, an installation on a Harvard University rooftop, solar carports, and huge ground-mounted systems. Let us put our expertise to work for your project!
Reach out here:
Pros and cons of commercial solar installations
We’d like to tell you that there are only pros and no cons for commercial solar, but that’s not exactly the case. Each individual installation requires its own cost/benefit analysis.
Here are some of the pros and cons of commercial solar:
Pros:
| Cons:
|
Advantages of a commercial solar installation
Energy bill savings: This is one of the most obvious, but most valuable, benefits. In states like Rhode Island and Massachusetts, those savings are guaranteed over the long-term, making it much easier for businesses to plan for future energy costs and savings. In addition, a solar installation paired with an energy storage system can be set to serve the business’s needs during peak even hours, reducing total power demand and saving even more money.
Eligible for incentives: The federal government offers the Section 48E commercial solar tax credit for projects that begin construction before July 5, 2026. This credit represents 30% of the cost to install the system. Many states offer solar incentives that can reduce the cost of installing commercial solar. Check with a tax advisor for more details.
Tax advantages and depreciation: For tax purposes, a commercial solar installation is treated as a business asset, meaning its tax basis is deductible, and its value is subject to rules for depreciation. Specifically, commercial solar installations qualify for 100% bonus depreciation. This allows you to claim the entire cost of qualifying solar equipment as a deduction in the first year of operation, which can be a great benefit.
Ongoing income from Renewable Energy Credits: Some states offer Solar Renewable Energy Credits (SRECs), which a system owner earns for every megawatt-hour of electricity the system generates. These credits can be worth hundreds or even thousands of dollars per year in income for system owners.
Societal and environmental benefits: Of course, one of the main reasons businesses choose solar energy is to reduce their carbon footprint and improve their local environment with an emission-free energy source. PR benefits can also accrue to your business, whether you serve B2B or B2C customers, everyone appreciates
Disadvantages of a commercial solar installation
Financing and tax complications: Some commercial solar installations are relatively straightforward and easy to handle between your installer and current tax pro, but others are more complex. Once you get into financing structures, complicated requirements to get grants and other incentives, it can get complex, and add to the cost of the installation. It’s worth getting right, though.
Requires space and proper infrastructure: The truth is, to host a commercial solar panel system, you need space! A commercial rooftop solar installation also requires careful structural analysis, and commercial-scale carports or ground mounted installations need large, unshaded areas of open ground or pavement, with an assessment of the soil underneath the site before digging or pouring any footings. If you don’t have the space to host your own installation, you can take advantage of community solar.
Interconnection concerns: Installing a commercial solar system means dealing with the utility company and local building authority. Many things can make this process difficult. Backlogs and delays for interconnection studies can affect project timelines on the scale of months to years. Paperwork with even one error can be a big problem. To avoid headaches, it’s essential to work with an experienced installation company.
Ready to get started?
We’ve helped our clients save millions of dollars with their commercial solar instalaltions. Click below to contact us and learn more.
Commercial solar panel cost and return on investment
As a ballpark figure, recent studies by the National Renewable Energy Laboratory (NREL) show that non-residential solar installations cost between about $1.50 and $3.00 per watt, depending on system size, location, and equipment.
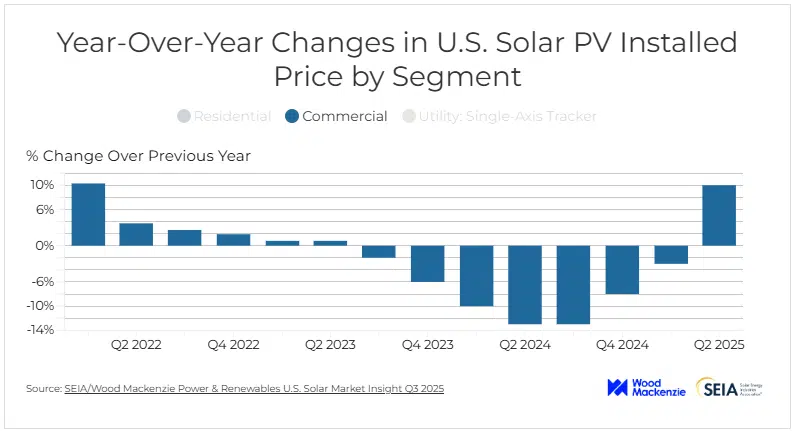
Research by SEIA and Wood Mackenzie indicate that commercial solar prices rose by 10% in Q2 2025, to an average of $1.57 per watt, partly due to tariffs and increased demand to get projects installed before tax credits expire.
What factors affect commercial solar installation cost?
The general rule is: the larger and simpler an installation is, the less expensive it will be. For example, a 100-kilowatt installation on a flat, 10,000 sq. ft. warehouse rooftop with large open spaces for panels might cost $2.00 per watt before incentives, whereas the same size installation on a rolling hillside might cost closer to $3.00 per watt.
The difference is due to the extra equipment (cement footings and tall ground-mounted racks), as well as the engineering needed to ensure the site’s geography is taken into account.
The truth is, it’s not possible to pin down a single price for a commercial solar installation, because every project is different. If you’re serious about getting an estimate of cost for your planned project, reach out to us here.
Financing options and ownership models
Another factor with regard to cost is the method of ownership and financings. Some businesses choose to own and operate their own commercial solar installations, while others host a system installed and maintained by a third party. This third party ownership usually takes the form of a power purchase agreement, under which the business agrees to buy the energy produced by the system over a long period, usually at a rate lower than the retail cost of electricity.
Owner-operator
Commercial solar installations are usually owned by the entity for which they provide energy. Small and medium-sized businesses often purchase these systems using cash or a loan, and reap the tax benefits themselves.
Large corporations sometimes can also purchase solar installations directly, but also sometimes issue green bonds that allow investors to provide capital for very large or widespread projects, such as huge installations at data center sites.
Power-purchase agreements (PPAs)
These agreements allow businesses to receive some of the benefits of less-expensive power without the tax and financing complications that come with ownership. They are most commonly used by non-profits, churches, and other organizations that may own their building, but may not have the tax appetite to take advantage of all the available incentives.
The step-by-step process of commercial solar installation
If you’re ready to take the next step in the commercial solar installation process, it helps to know a bit about the process, starting with the general timeline.
What to know before getting a commercial solar installation
The entire process, from first meeting with a project manager to flipping the switch, can take anywhere from six months to a year or more. That timeline can change based on factors like your intended system size, the complexity of financing, local permitting requirements, and—most significantly—your utility’s interconnection study process.
Here’s a guide to the steps in that process:
Step 1 – Initial conversation
Building a commercial solar panel installation is a complex process, but the work pays off.
When a new client comes to us, we like to get to know their needs and desires for the project. After an initial conversation, one of the first steps is a site visit.
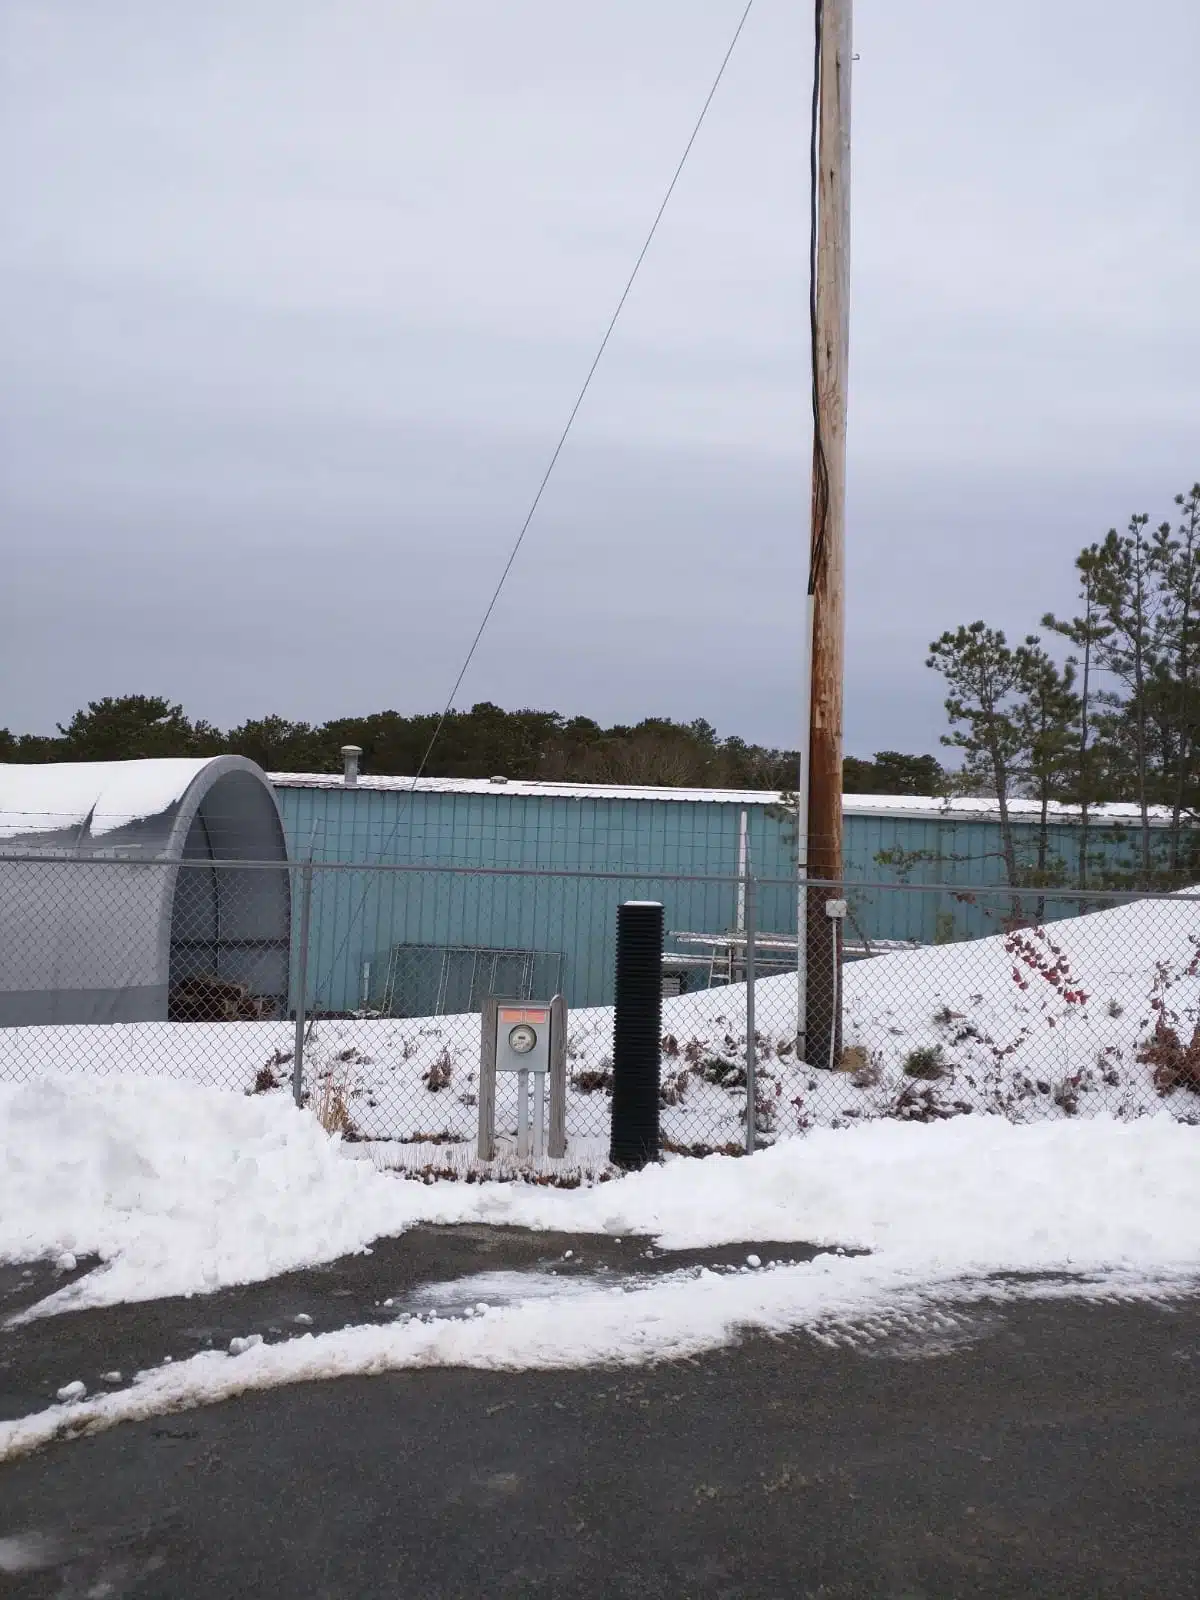
Utility Meters and snow
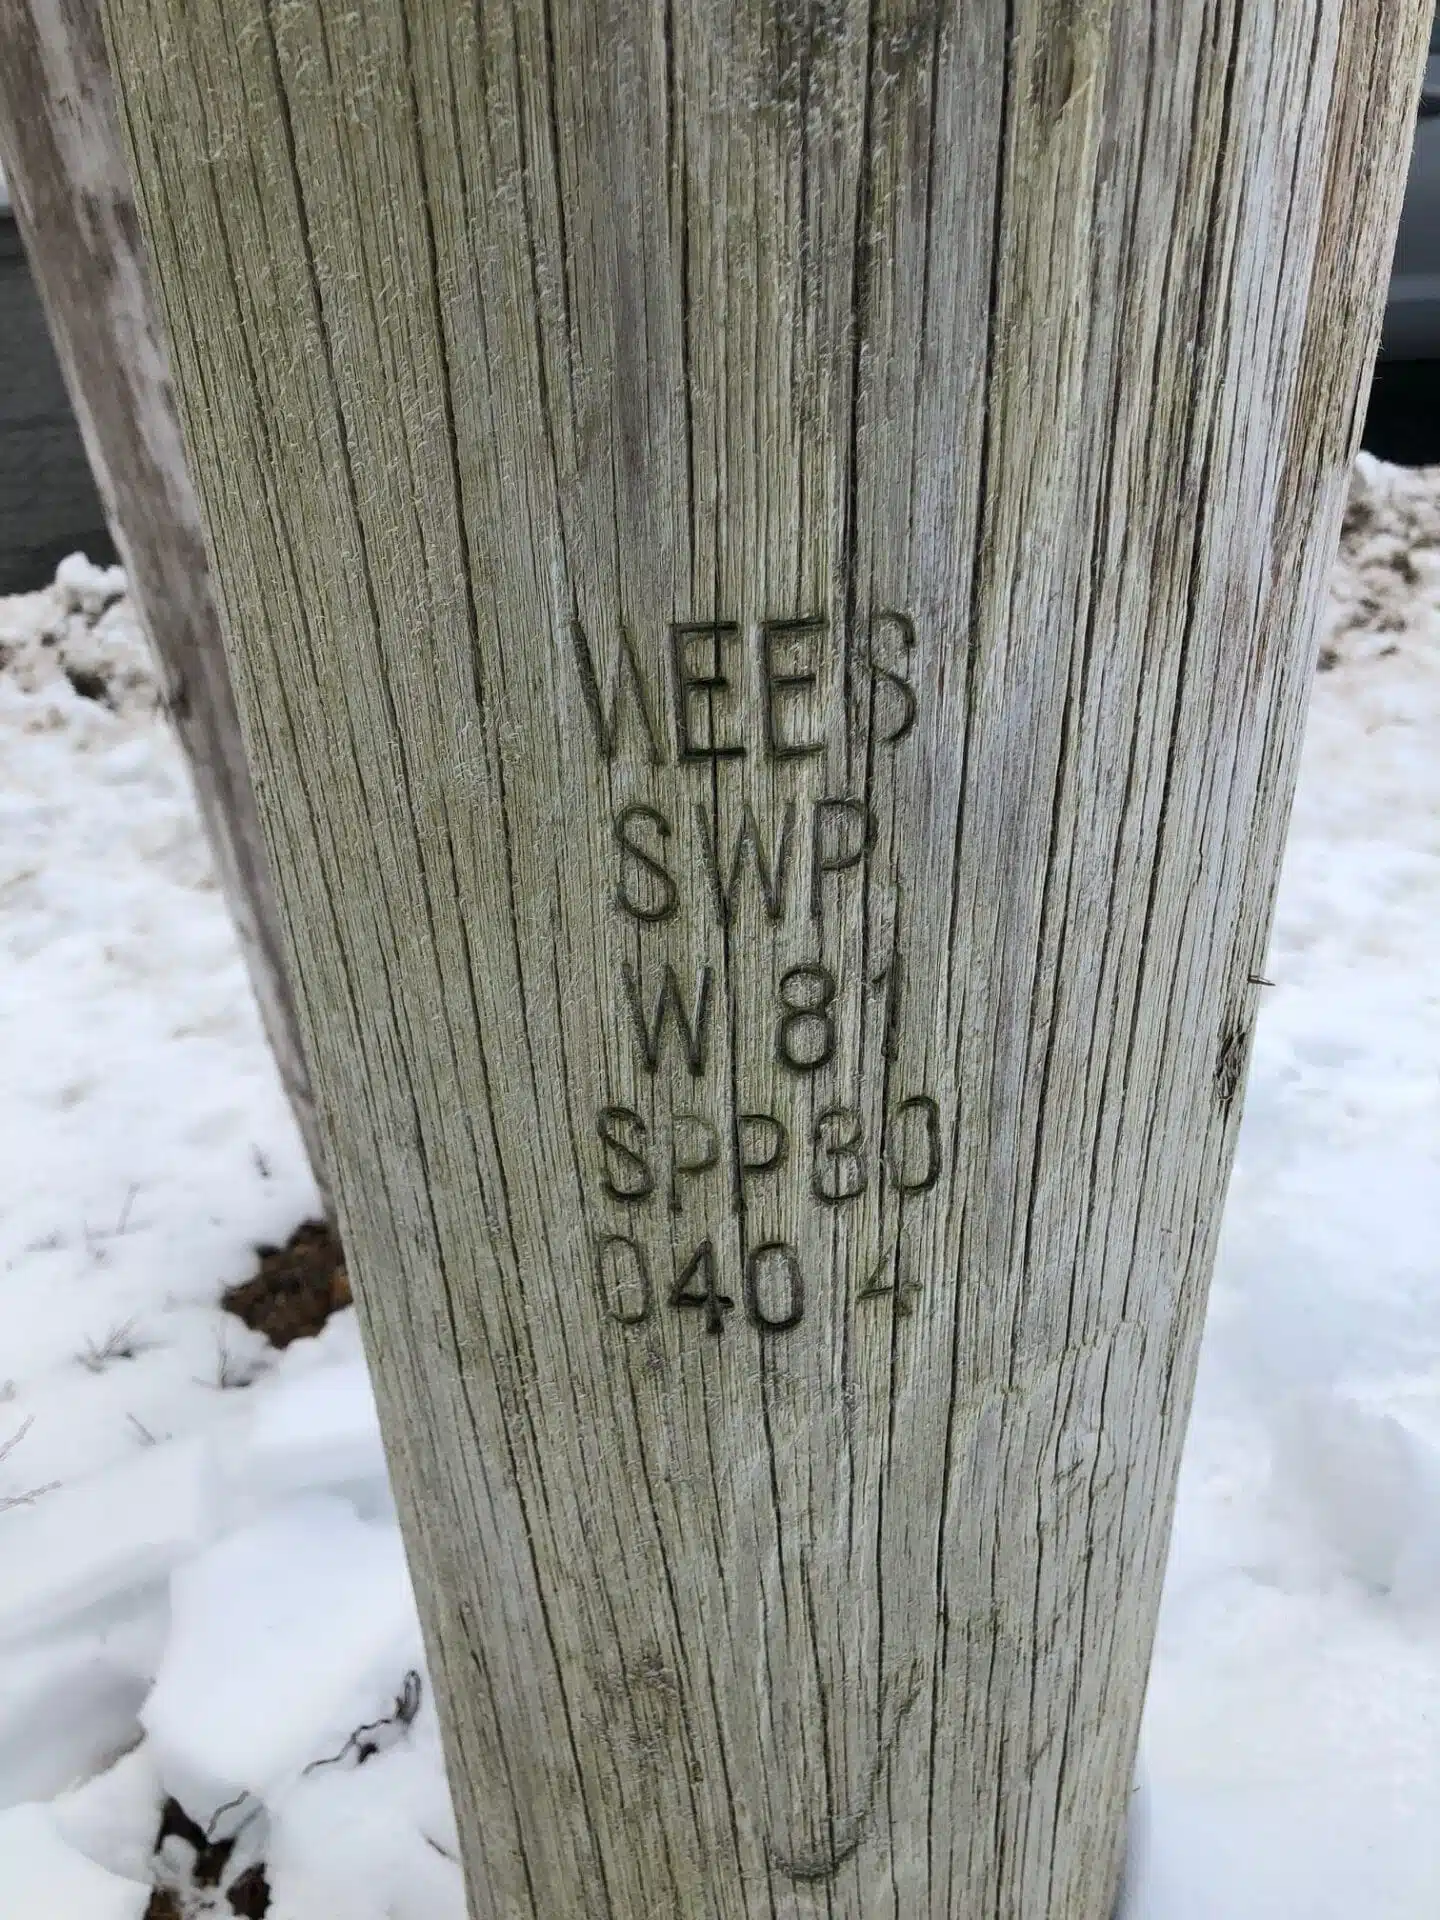
Pole Numbers matter
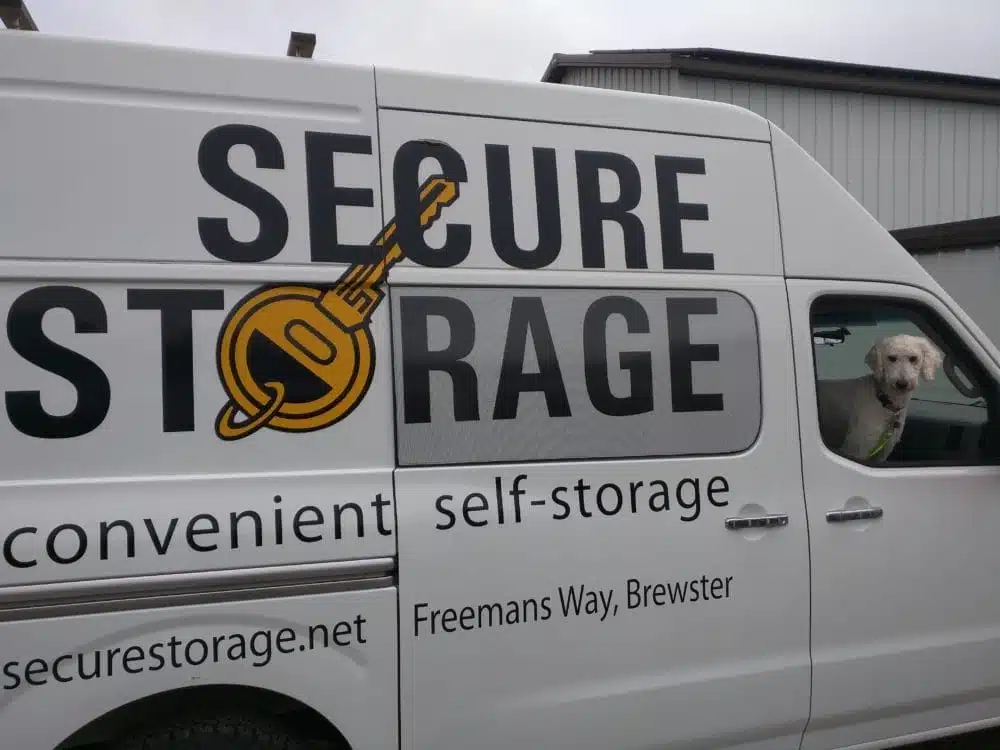
Secure Storage & Doggo
During the site visit, we take pictures of the electrical infrastructure (powerlines, electric meters) and talk with the client about how much solar power might fit on their building or property, and discuss how federal and state incentives like the Massachusetts SMART solar program work.
Step 2 – Feasibility Analysis
Lots of work goes on in between the original hand shaking and the beginning of construction. The second step is to look at all aspects of the project on paper before signing a contract and moving ahead with the installation.
A commercial solar feasibility analysis consists of two main things:
- A preliminary system design and energy generation estimate
- Initial financial modeling for payback and ROI
Preliminary system design
One of the first things we do is roughly figure out what the customer can actually build, and then what that build might generate in terms of revenue – this is called the feasibility analysis.
The tools we use for this are Helioscope and Energy Toolbase. They tell us how much solar we can build and how much electricity it will generate. Commercial Solar Guy Design Engineer Benjie Borra likes to say these tools let us see “95% of what will happen in the end.”
Here’s what a Helioscope design looks like:

- Design Layout – what might we build
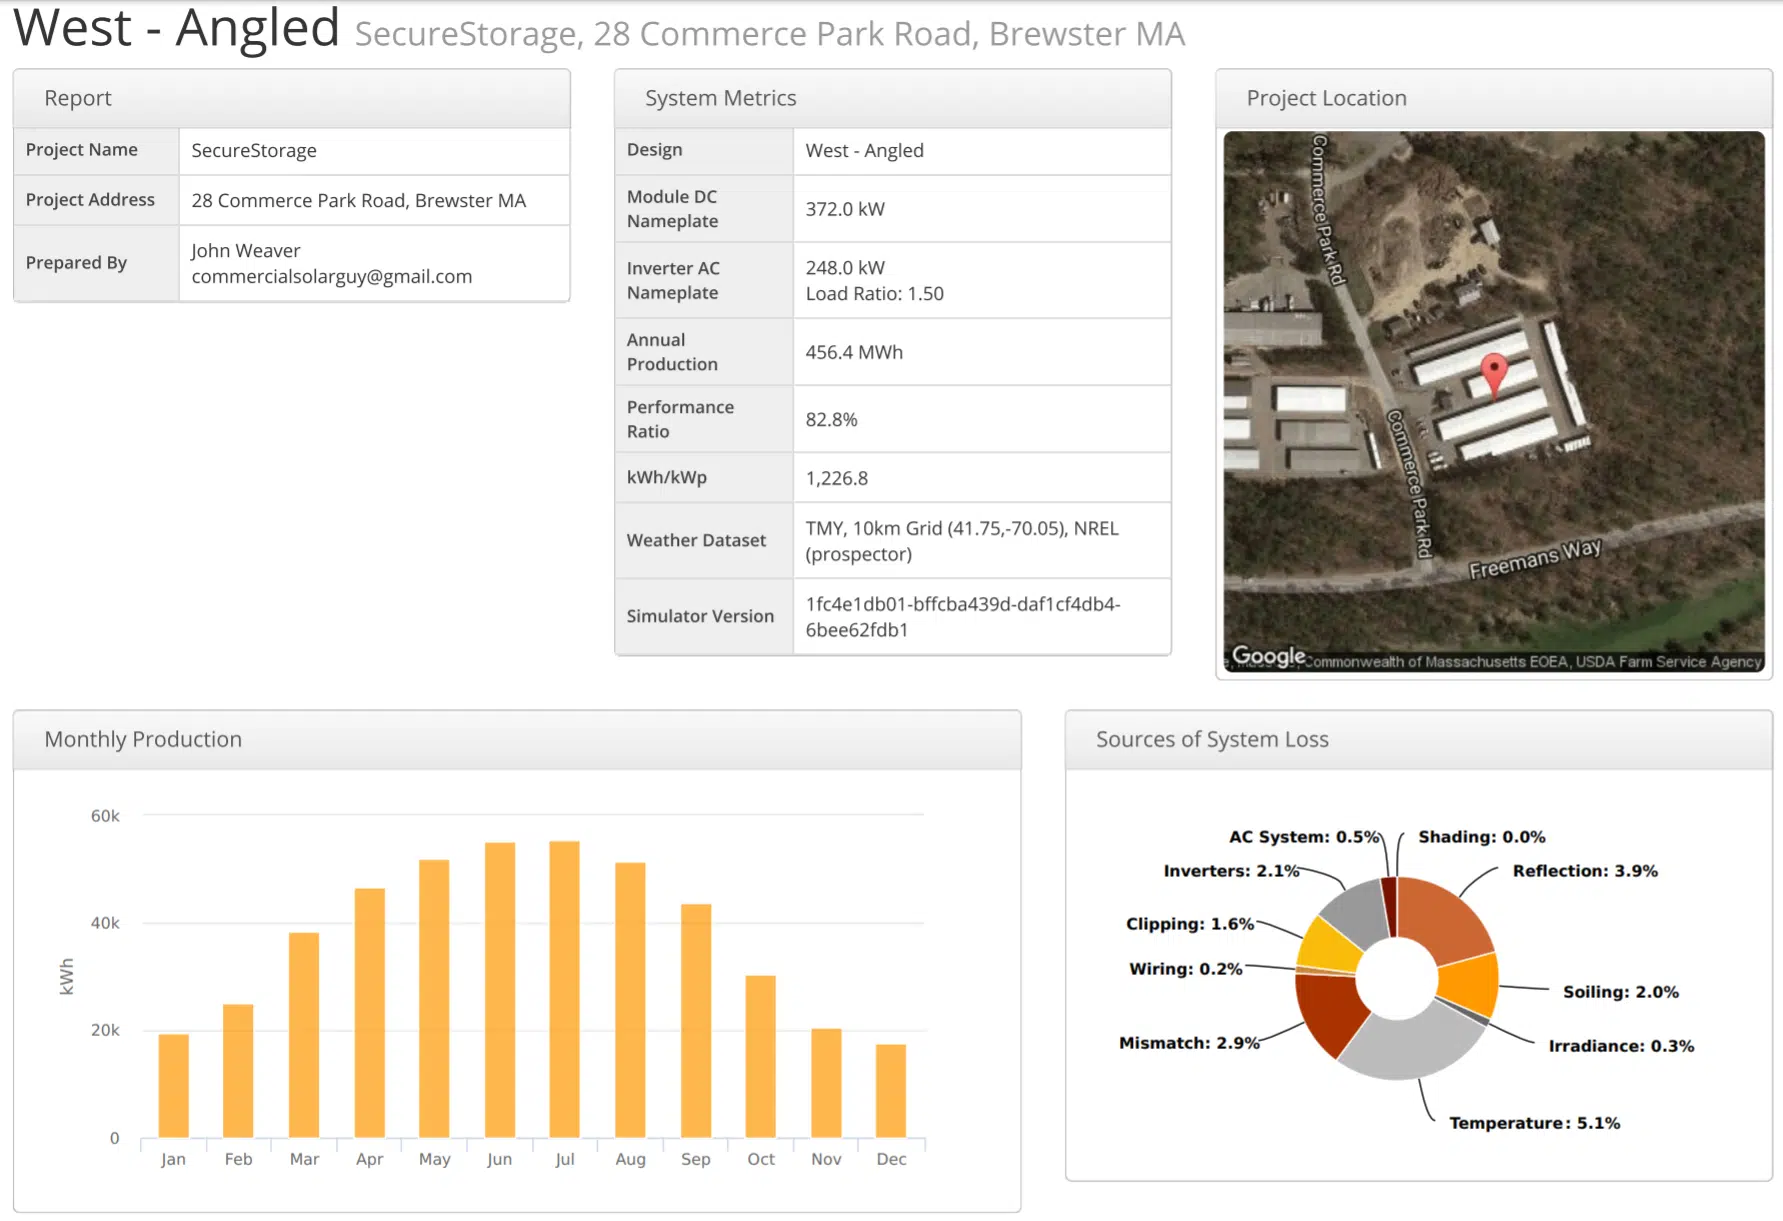
- Feasibility Analysis – Helioscope system layout
This initial pass doesn’t give us final designs and engineering plans, but it does give us preliminary images (shown below) that show where we can place the solar panels, how many total panels can fit, the amount of electricity that would be produced monthly and annually, where our system losses would be and a bunch more.
If you’d like to dig deeper, check out this pdf with an early system design for a large commercial solar project in Brewster, MA. While there were some changes made before the final plans were approved, this document gives us a pretty good idea of the electricity production numbers that make the project pencil out financially.
Initial financial modeling
Most people looking at solar panels for commercial buildings really appreciate the environmental benefits, but what they really want to know is how much money will solar power save them.
That’s why we use a tool like Energy Toolbase or a Microsoft Excel spreadsheet. We need to clearly communicate the financial information. An example of a financial analysis from Energy Toolbase is pictured below.
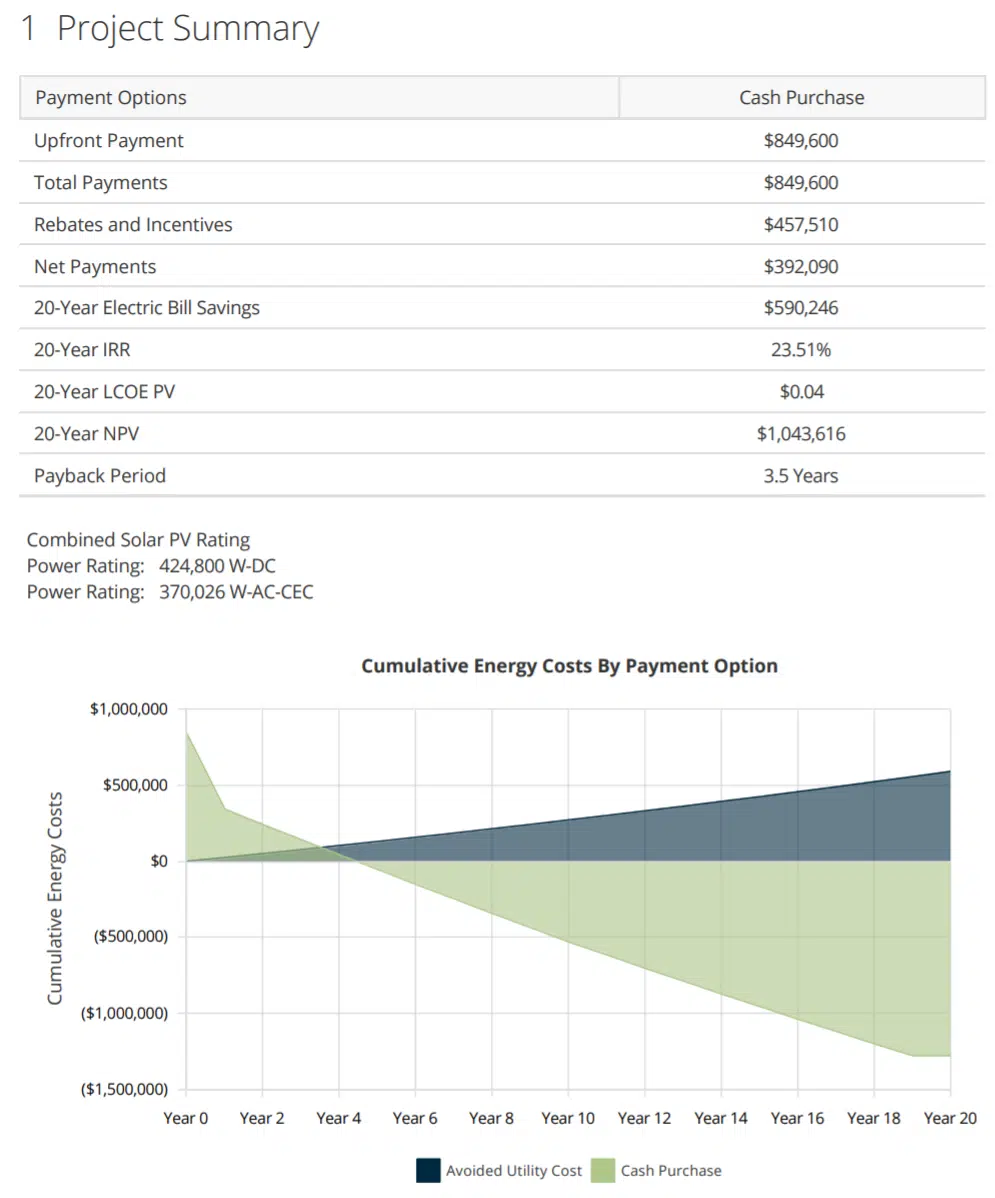
- Feasibility Analysis – Energy Toolbase
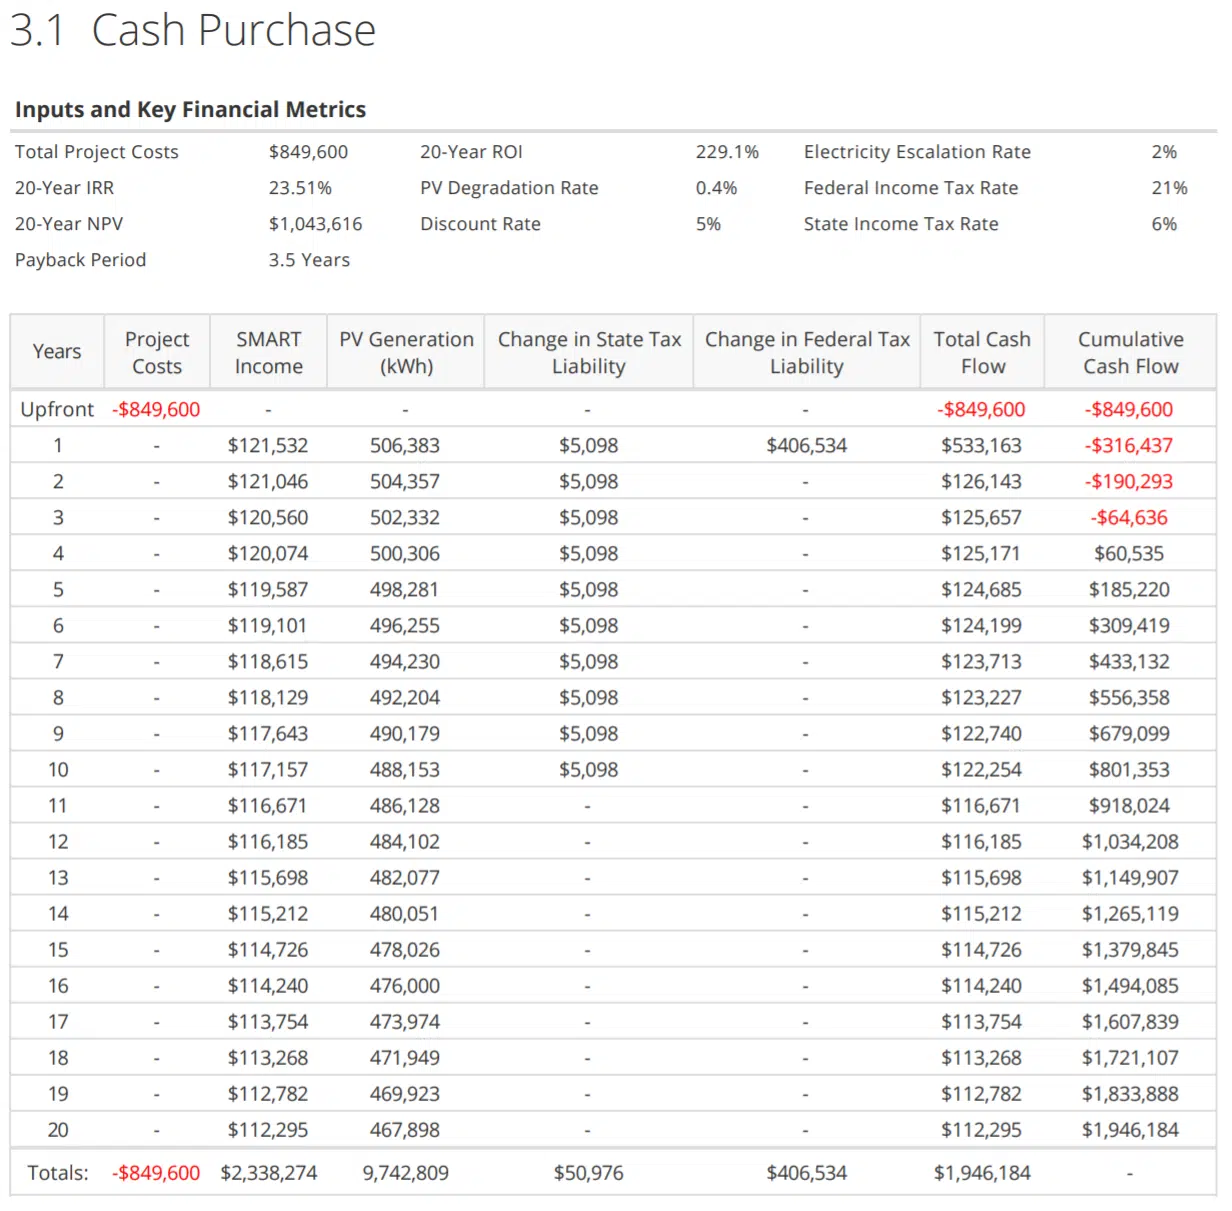
- Feasibility Analysis – Cash Flow – Energy Toolbase
In this high level estimate you see project costs, tax benefits and incentives, payback periods, and a visual representation of cash flow over time. This is the basis of the information that your bank will want to see.
In the cash flow spreadsheet on the right, Energy Toolbase goes into individual revenue streams on an annual basis. You get to really see the meat – how much Massachusetts pays for the electricity, state and federal tax liability (accelerated depreciation and the 30% federal tax credit for solar power), and the total and cumulative cash flows.
The far right column there – around where the numbers turn from the red to the black – is where million dollar decisions are made.
Commercial Solar Guy combines the skills of an experienced project developer, 20-year civil engineer, system designer, and construction manager who oversee all our projects. If you’re planning a commercial solar installation, we’d love to discuss what solar power can do for you.
Reach out here.
Step 3 – Design, permits, incentives & interconnection study
Once we’ve done the initial work to help our clients understand whether their projects are financially feasible, it’s time to step up to professional-level work. This means we’ll finalize a design for the system, apply for permits, and help clients investigate solar tax credits and other incentives that may be available to them as the project owner.
It’s also extremely important to know whether the grid infrastructure in your area can handle the potential output of the proposed solar installations. The process of hooking your solar installation into the grid is called interconnection, and we need to work with your utility to be sure their wires can handle the new power.
How an interconnection study works
The grid can only handle so much power flowing from local solar systems. In order to know if your solar installation will be easy to connect to the grid, you’ve got to ask the utility companies.
The power lines that serve your neighborhood are known as feeders, and each feeder has a rating for how much power it can carry at one time. This rating is known as “hosting capacity.”
If there are enough customers on the feeder who have solar installations that transmit electricity through the wires, another solar installation can’t be added unless the feeder is upgraded. When planning out a new commercial solar installation, we submit requests to the local utility to see two things:
- The amount of hosting capacity available
- Any other projects that have submitted applications for capacity
Here’s an example of what we don’t want to see:
The reason we don’t want to see that is all those projects are in line in front of us. That’s a scary sight! It means there will be a long wait until we get our chance to install.
There are many places in the Massachusetts marketplace with complex interconnection challenges. We can pull up hosting capacity maps for Eversource, National Grid, and Unitil to get an idea of your local feeder capacity, then submit the proper forms to the utilities
While there will be many installations where the areas are defined as saturated for various reasons, you can see that it takes work to get a system placed well. Below is an example of a recent pre-application located in Bristol, Rhode Island. This document looks good!
Note how it says there is 655 kW of “DG on the Feeder”, and that the voltage at the substation is 12.47 kV. The 655 kW means there is that much solar power already installed, or pending to be installed on the same powerlines. The 12.47 kV represents what the powerlines can handle and, if things are going well, the hardware can hold more than 10,000 kW.
Determining how much you can save with incentives
This step requires bringing in the services of tax experts. We can work with your Certified Public Accountant (CPA) or our own to make sure you’re maximizing your tax benefits.
The current incentives available to commercial solar owners includes:
- The 30% Federal Investment Tax Credit (ITC) under Section 48E
- Federal 100% bonus depreciation
- State incentive programs like the MA SMART solar program and Rhode Island Renewable Energy Fund and RE Growth program.
We’re not tax experts, but we know tax experts. Their guidance and our cutting-edge software tools can provide incredibly accurate and detailed predictions of solar installation cost and savings, along with the value of incentives.
If your CPA says they don’t know how to leverage the available solar incentives to help you save big, get in touch with us.
Design and permitting
We got the design 95% of the way there in the previous step, but now it’s time to get it finalized. We’ll turn the initial designs into comprehensive, ready-to-build blueprints, providing everything necessary to obtain the permits and get the job done right.
Here’s what we generate for each job:
- Final Electrical Schematics: We create a detailed Single-Line Diagram that shows all electrical components, wiring, and safety devices (e.g., disconnects, overcurrent protection) to ensure compliance with the National Electrical Code (NEC). This includes details about the solar array configuration, wire sizing and conduit routing, inverter placement, and system safety protections.
- Mechanical & Structural Drawings: These are detailed plans for the mounting system (racking), including attachment methods to the roof or ground, and calculations to certify the structure can withstand local environmental forces.
- Bill of Materials (BOM): A complete, finalized list specifying every component, from panels and inverters down to nuts, bolts, and wiring, to ensure compatibility and durability.
These documents are then sent to your local Authority Having Jurisdiction (AHJ). These are basically any entity that gives permission to build and install solar installations, including the local building department, fire marshal, and planning or zoning departments.
We have years of experience working with the AHJs in Massachusetts and Rhode Island. We know exactly how to produce a complete application package to ensure your project moves smoothly through the permitting process and on to the construction phase.
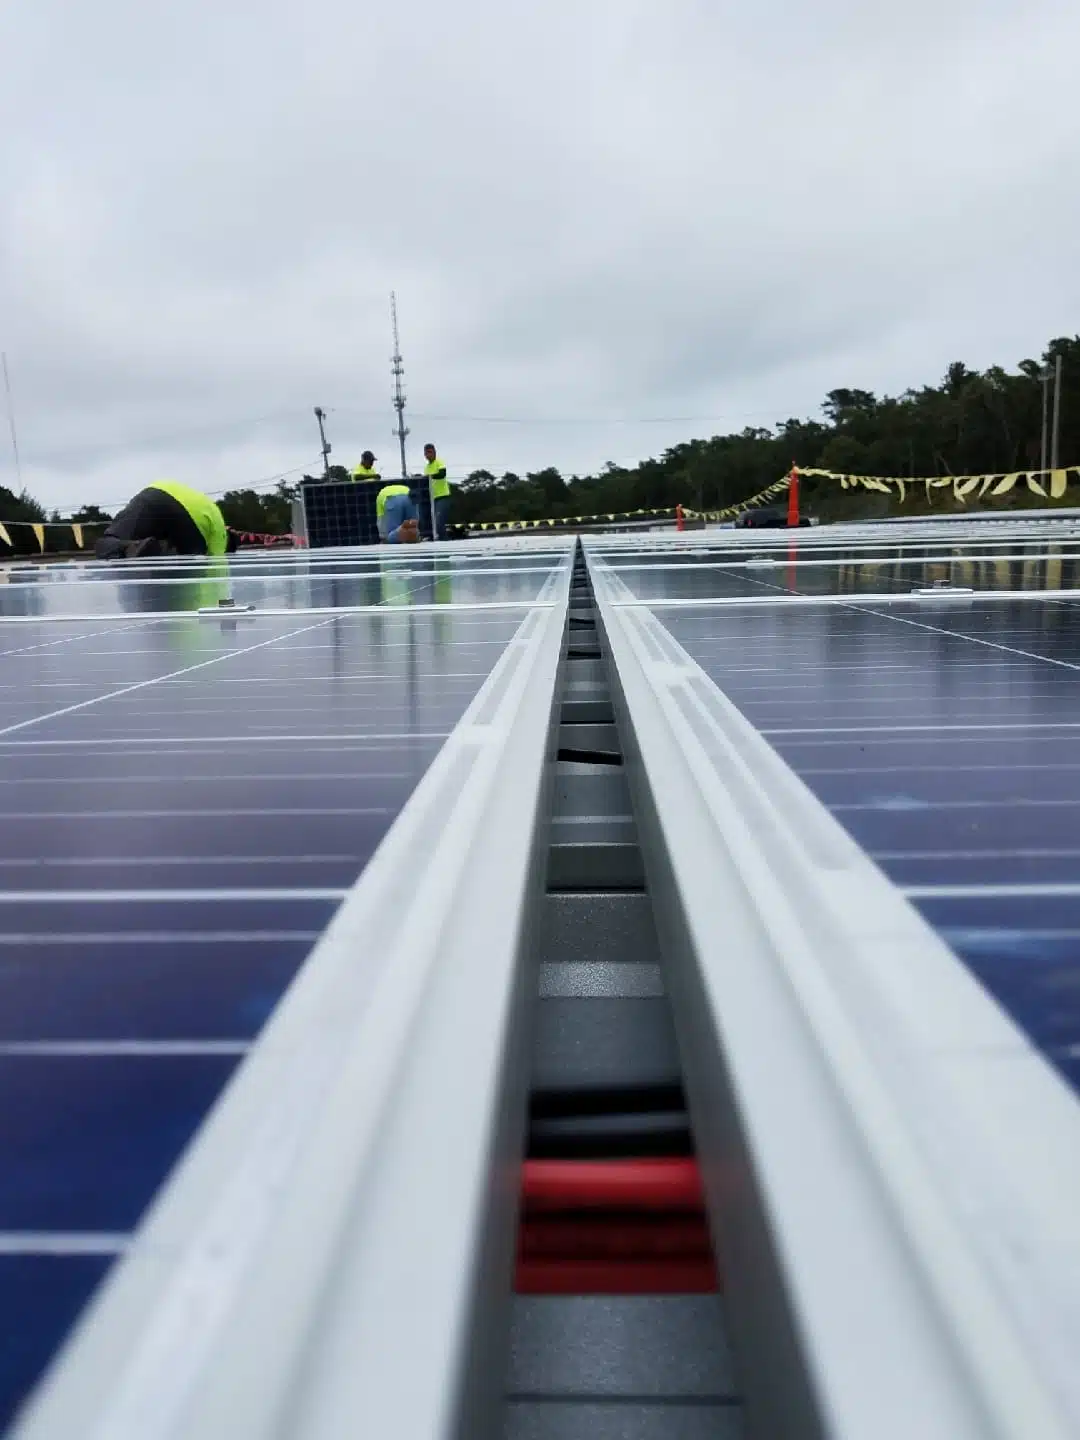
Step 4 – Construction
Now that all the paperwork is out of the way, it’s time for the fun part! We love building commercial solar installations because the Commercial Solar Guy team shines when we’re using all of our skills together to deliver excellent work for our clients.
IMG_20180821_130642
Lots of wire, #10 Copper

1454
Caution

IMG_20180807_114132
Up and down the ladders
IMG_20180807_115908
Field of L Feet

IMG_20180807_115939
The math
IMG_20180821_125419
Raceways running copper
1478
Gotta line up the rows
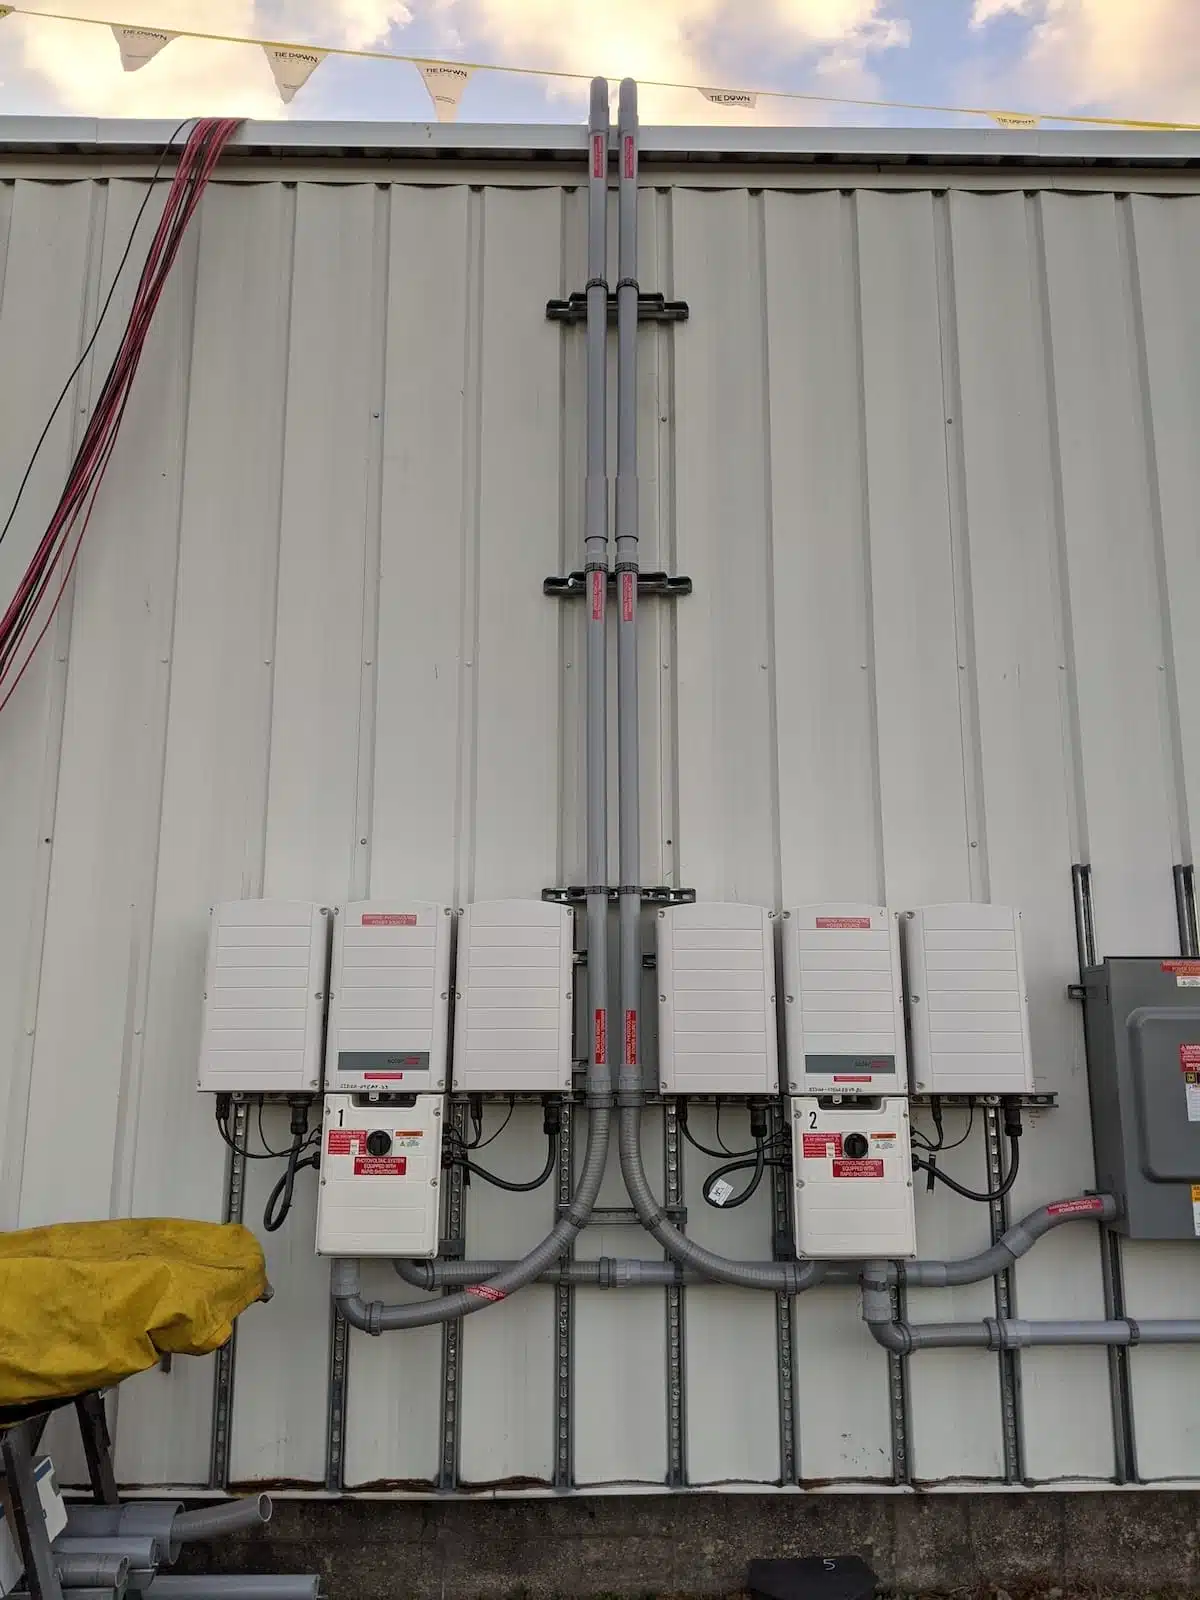
image10b Commercial Solar Guy solar panel installation hardware
Conduit running down between inverters
DCIM100MEDIADJI_0054.JPG
The sun knows where to shine
Steps in the construction process:
- Material delivery: All the materials necessary to complete the job are delivered to the site in the days before the installation begins. After delivery, our construction team comes on site to ensure all the necessary components are present.
- Site preparation: The crew arrives to set up safety perimeters, install temporary fencing, designate staging areas for equipment, and begin any necessary groundwork to prepare for installation.
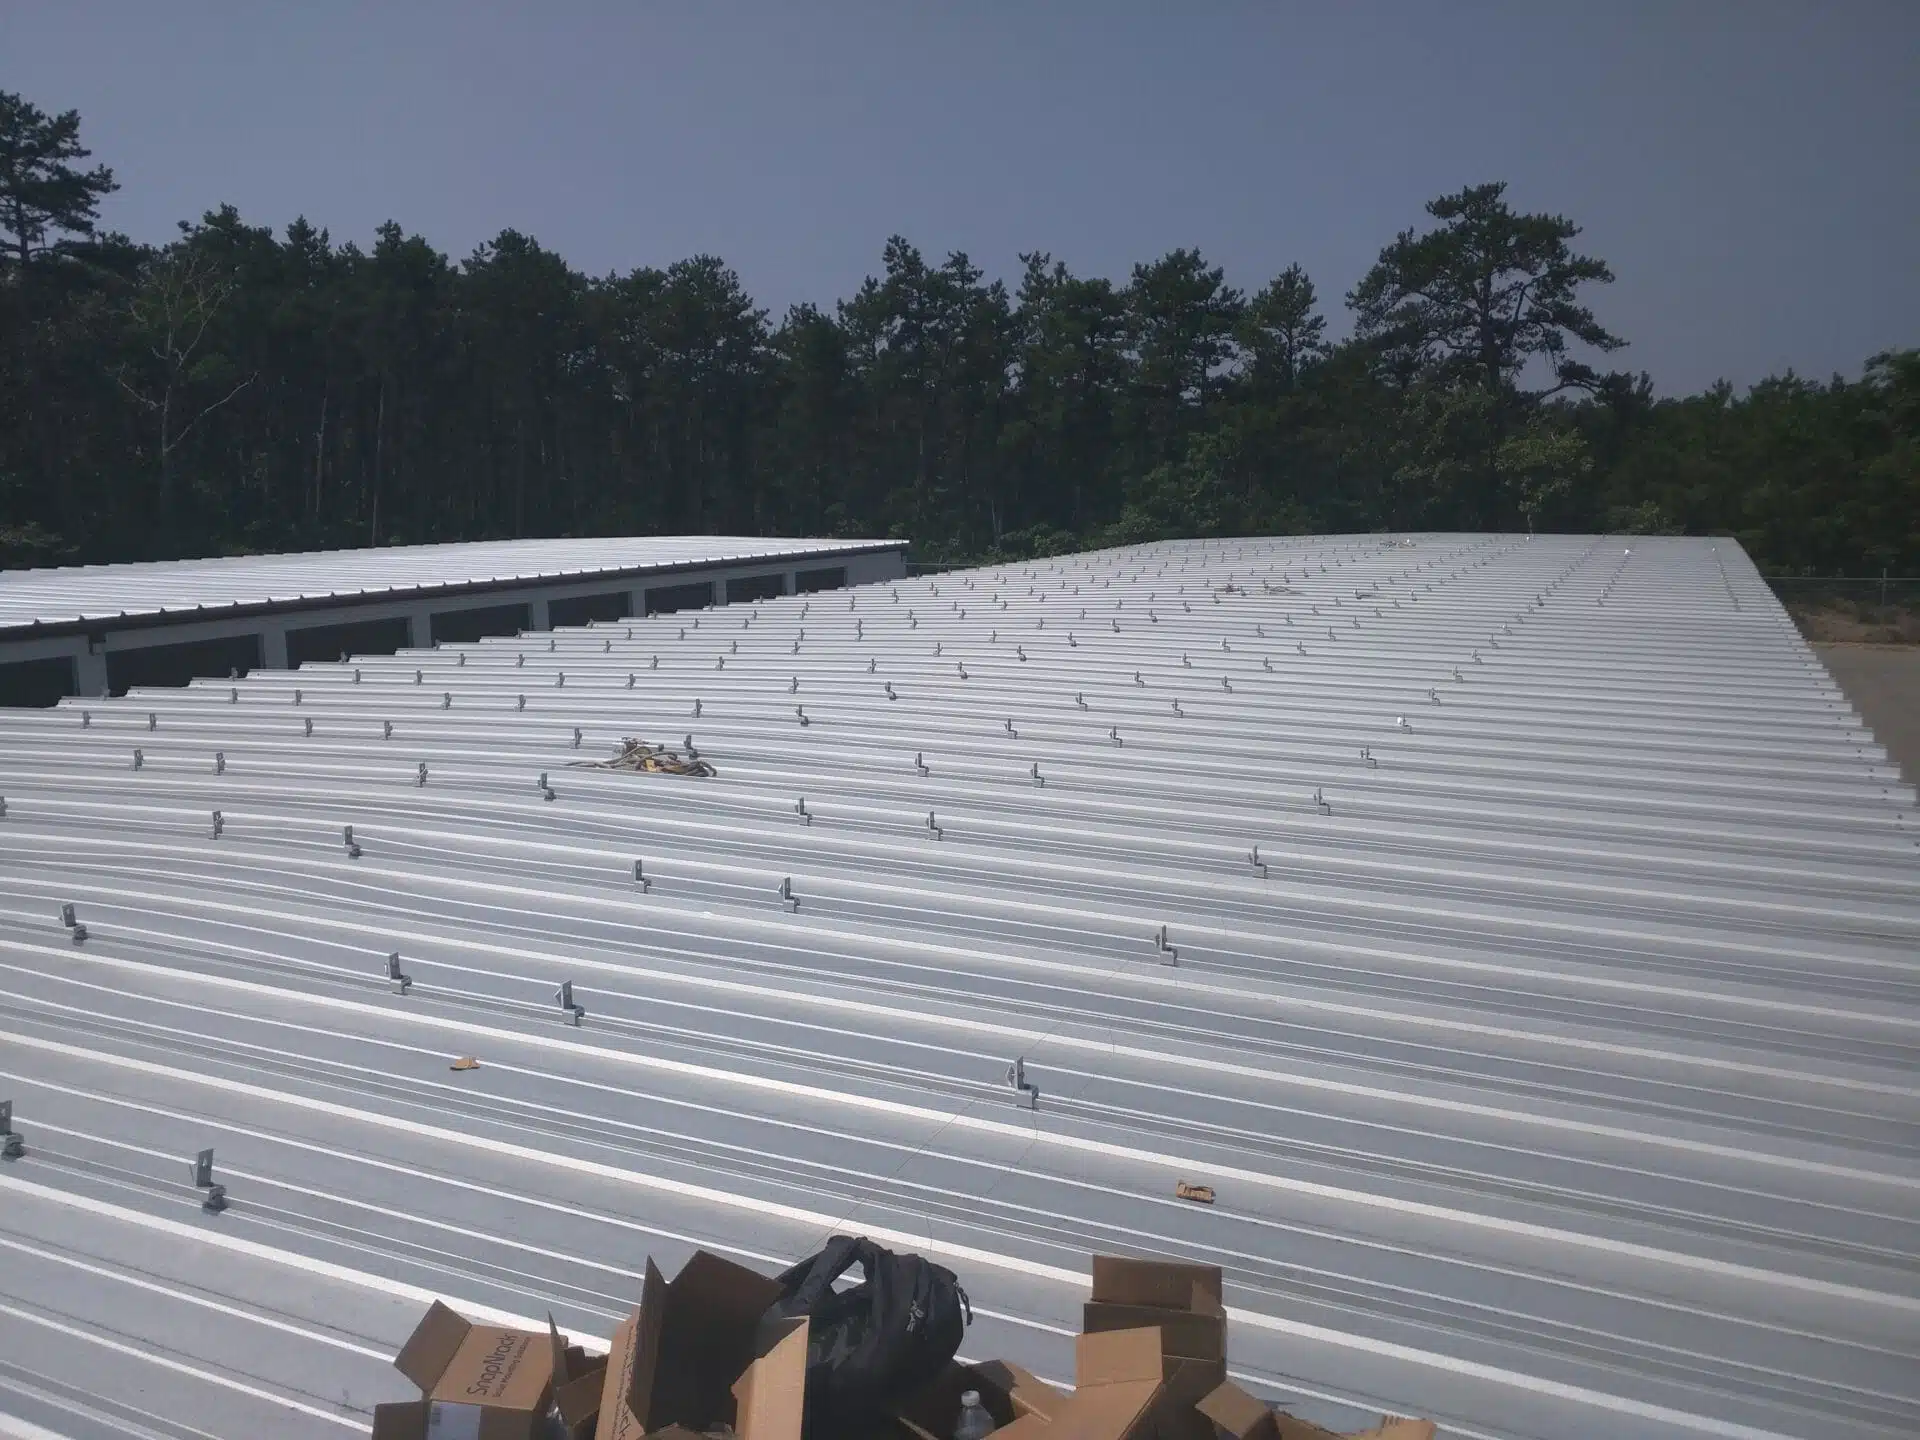
- Layout and mark-out: The engineering team marks the exact locations for racking attachments on the roof (or posts for ground mounts) to ensure alignment with structural beams and the approved design.
- Racking installation: Crews install the structural mounting system. On a roof, this involves attaching any necessary ballasts, along with anchors and rails; for ground mounts, it involves driving piles and building the metal sub-structure.
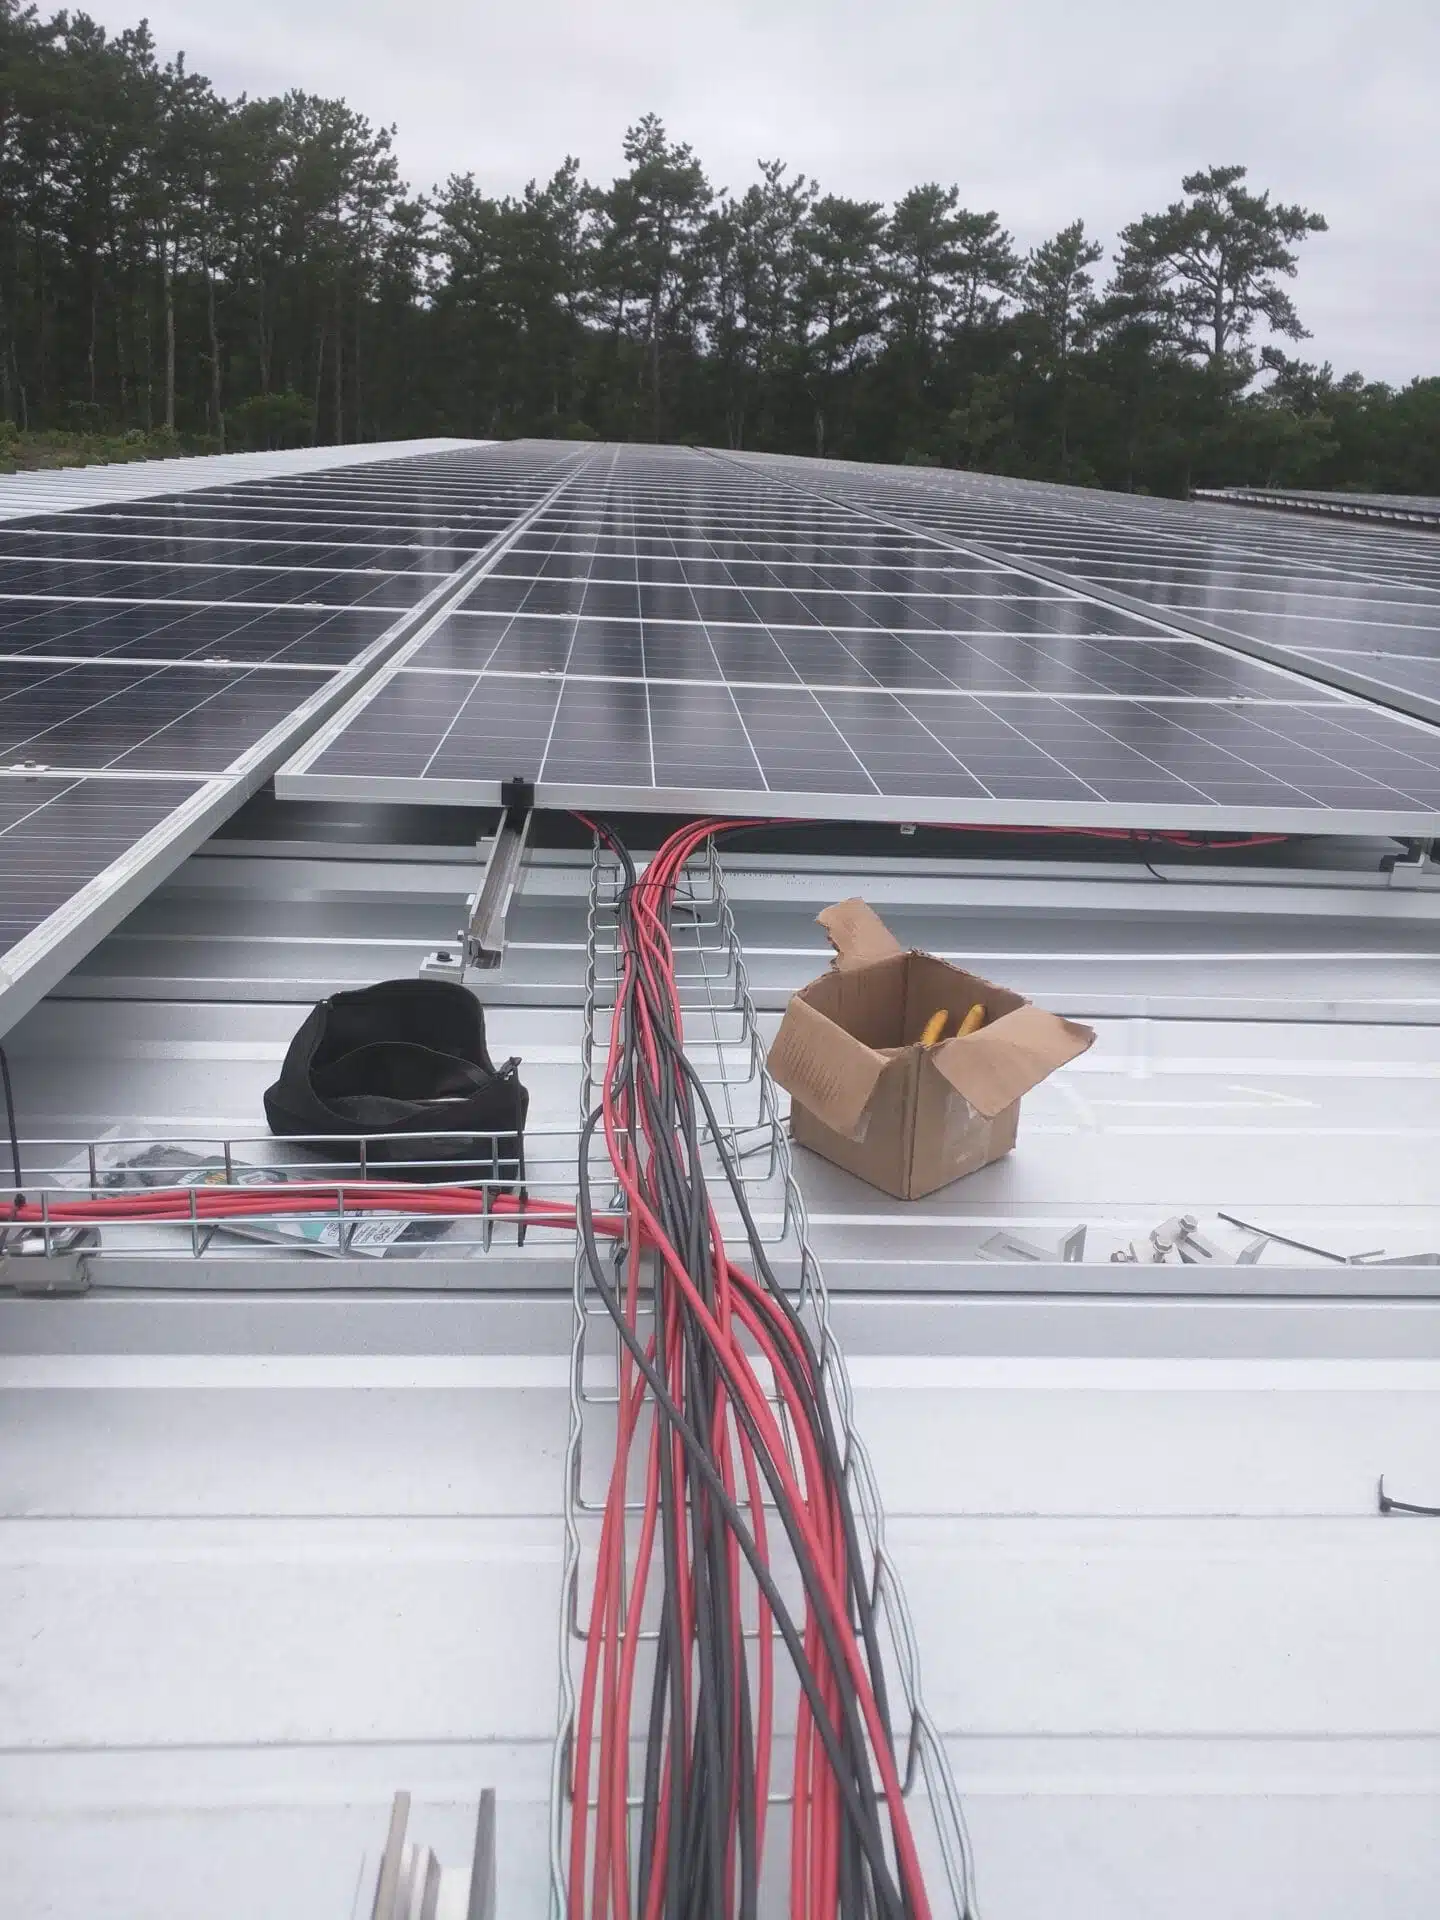
- DC wiring and rough-in: Electricians run conduit and wiring across the racking system to prepare for the panels, ensuring all wires are managed and protected from the elements.
- Panel Mounting: The solar modules are lifted to the roof (or transported to the field), secured to the racking system, and plugged into the wiring harness.
- Inverter and AC Electrical Work: Inverters are mounted and connected to the solar array’s DC output. Simultaneously, electricians install the AC conduit connecting the inverters to the building’s main switchgear or utility connection point.
- Cleanup: Once construction is complete, the crew buttons up all the loose ends and collects discarded materials, metal cutoffs, and any other waste. We pride ourselves on leaving your property as close to how it was when we came on site, just with an awesome new solar panel installation.
Step 5 – Commissioning and final approval
Once the construction is done, we can’t just flip the switch and turn on the system. First, we have to send our techs out to program the inverters and make sure every component is working properly. Quality assurance and safety checks are essential at this stage.
This is also the time where our team will take many photos and provide digital proof of the system’s construction to the financing company and your insurance company. If the project is very large and/or was financed with tax equity, there will likely also be a site audit from an independent engineer.
And remember those AHJs from step 3? It’s time for their representatives to inspect the system and give us permission to operate it. There will be visits from the building inspector, fire department, and local utility at minimum.
Once everything has passed inspections, we’ll be given a document with the three sweetest letters in the solar business: PTO. That stands for “permission to operate,” and it means we can turn your system on and you can start raking in the benefits!
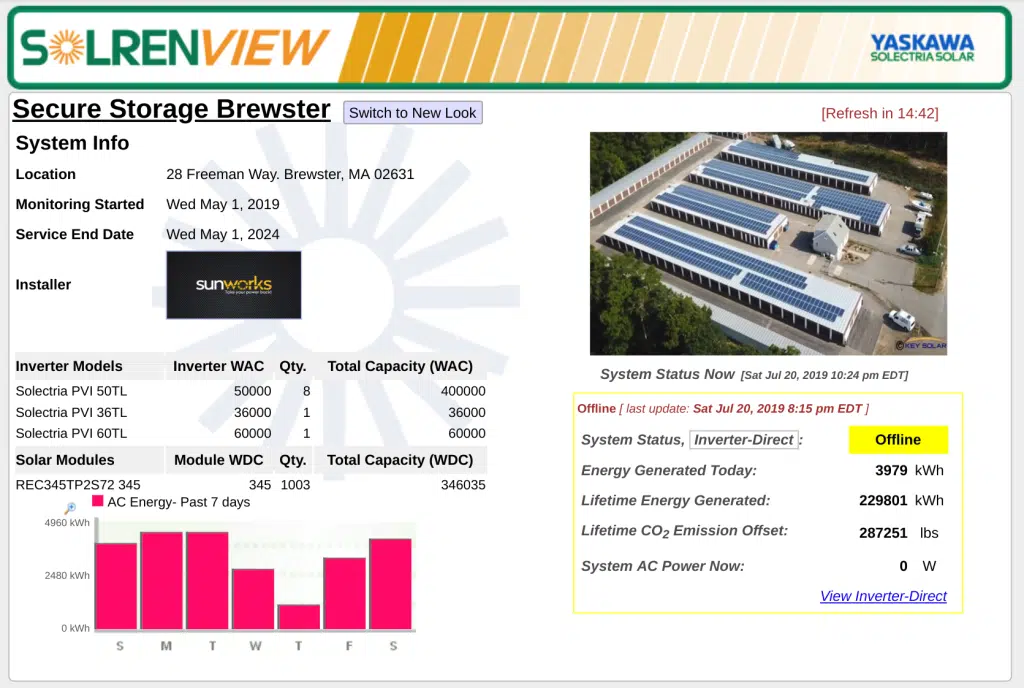
Step 6 – Monitoring and long-term maintenance
The construction step may have been our favorite part, but this is the client’s favorite part Yes, you get to monitor the output of your solar panel investment to understand exactly what’s going on – 24 hours a day, from anywhere on earth. Check out thelive production of our system(which is shown below).
Sunworks, our contractor for this project, offers a 25 year warranty with system monitoring as the lynchpin. You’ll be given a list of basic upkeep tasks to do on a schedule, and if something does happen – expect a visit or two in the first couple of years to ensure your system is running optimally.
Explore your commercial solar options
Now that you’ve had a chance to learn all about the process of installing commercial solar panels, why not reach out to us and get started on your own solar project? We’ve helped our clients save millions of dollars with their commercial solar installations.
Click below to contact us and learn more.